Getting started
Set up Axtolab AI Spend Governance for WordPress AI budget enforcement.
Updated
Axtolab AI Spend Governance enforces monthly AI budgets on the WordPress 7.0 AI Client: per-plugin caps, a sitewide cap, threshold alerts, a hard stop that blocks calls before your provider is charged, and a sitewide kill switch.
Before you start
- WordPress 7.0 or newer (the native AI Client ships with 7.0).
- An AI provider configured under Settings → Connectors (OpenAI, Anthropic, or Google).
- Your AI Spend Governance license key from axtolab.com.
Requirement: the free AI Spend Monitor
Governance enforces budgets against the usage data recorded by the free AI Spend Monitor plugin — it must be installed and active first. This is a hard requirement: WordPress will refuse to activate Governance until the Monitor is active, with a message naming the missing plugin. That’s expected — install the Monitor and try again.
Where to get it: the Monitor zip is included with your purchase download (and, once it is live on the WordPress.org directory, WordPress will offer a one-click install from the activation screen instead).
Setup
- Install and activate the free AI Spend Monitor (included in your order download).
- Install and activate Axtolab AI Spend Governance (also in your order download).
- Go to Axtolab → AI Spend Governance and enter your license key. Enforcement is enabled once the license is active.
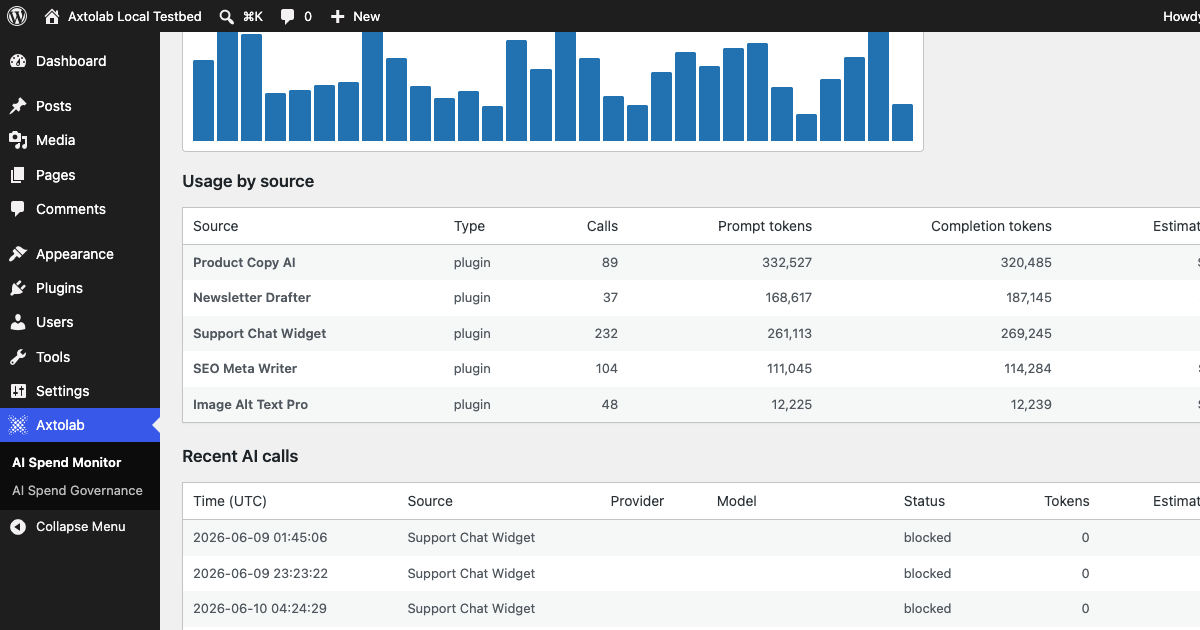
- Let the site run normally for a day or two. The Monitor records every AI call under Axtolab → AI Spend Monitor, so you can see which plugins spend what before choosing limits.
Set your first budgets
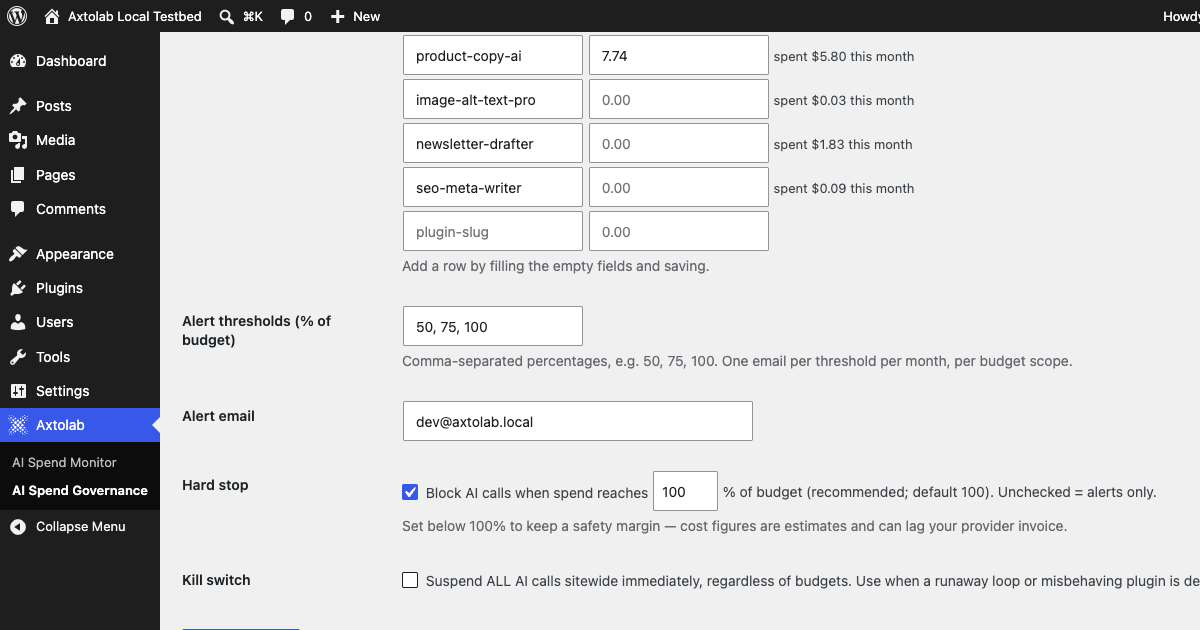
- On Axtolab → AI Spend Governance, set a sitewide monthly budget — your absolute ceiling for the whole site.
- Optionally set a default per-plugin budget and individual per-plugin budgets. Plugins already seen in usage data appear as pre-filled rows.
- Leave Hard stop enabled (recommended). When spend reaches the configured percentage of a budget (default 100%), further AI calls from that scope are blocked before any provider request is made, and well-behaved plugins hide their AI features automatically. Set the stop point below 100% if you want a safety margin — cost figures are estimates and can lag your provider invoice.
- Set the alert thresholds (default 50, 75, 100% of budget) and the alert email. Each threshold sends one email per budget scope per month, and a separate notice is sent when calls start being blocked.
Budgets are monthly and reset on the first of each month (UTC). A budget of 0 means unlimited.
The kill switch
If a runaway loop or misbehaving plugin is hammering your API key, enable the Kill switch on the settings page. It suspends every AI call sitewide immediately, regardless of budgets, until you turn it off.
How blocking appears to other plugins
Blocked calls receive a standard WP_Error (prompt_prevented) from the AI Client, and is_supported_*() checks return false — so plugins built on the native AI Client degrade gracefully instead of breaking. Each blocked call is recorded in the Monitor dashboard with the plugin that triggered it:
Notes on cost figures
Costs are estimates derived from recorded token counts and published list prices per model. Caching and batch discounts are not modeled. Developers can adjust rates with the aismon_cost_rates filter. Treat your provider invoice as the source of truth.
Next: use the budget rollout checklist for your first enforced budget.
Question about this page?
This form tags your question with the product, docs page, and category so support can triage it quickly.